


Pi-hole: Network Ad-blocking for All
- T. Kearny Vertner, III

- Aug 28, 2020
- 9 min read
It's easier than you think to download and run network-wide ad-blocking with no need for individual user-configuration.

If you can't tell by the design of this blog, I'm not a big fan of internet advertisements. I mean, I understand that it would help me offset the cost of operating it (which comes out of pocket) and would probably make all kinds of business sense, but it would likely me less pleasurable for folks to read. Moreover, I probably wouldn't make a lot of friends with my potential advertisers with how-tos like this one. With that idea in mind, I'm going to discuss how I installed Pi-hole on my home server. Despite the name, you don't have to install it on a Raspberry Pi microcomputer! As with prior how-tos, I'm going to focus on how I made this work in a macOS environment (since I'm a shameless Apple fan), but a lot of the ideas are dead-simple to implement in a Linux environment or relatively easy to adapt to a Windows one. In order to install a Pi-hole of your own, all you need is a computer running macOS somewhere on your network that stays on all the time and has a reliable connection. I used a Mac Mini as the household server for a variety of needs, including Pi-hole. Alternatively, you can also use a dedicated piece of hardware running Linux (including a Raspberry Pi).
First of all, what is Pi-hole? Pi-hole is a donation-funded community-coded open-source project to filter Domain Name Server (DNS) requests prior to pushing them to your actual DNS service. It filters against a constantly-updating blacklist of domain names associated with advertising services. Of course this invites the obvious follow-up question:
What is DNS? We all know that Facebook can be reached in a web browser by typing "Facebook.com" in the address bar, but did you know that you can also get there by typing "31.13.93.35"? Behind every memorable human-readable domain name is an IP address. The magic that makes this work is a DNS request, which goes to a DNS server each time any piece of software requests data from a domain name. Most of the time, this process is configured by your Internet Service Provider (ISP), in some cases even resolving to an ISP internal search site if it couldn't find an IP address to match.
In the case of Pi-hole, it acts as a DNS gatekeeper of sorts, checking each DNS request on your network against its advertising service blacklist. Pi-hole drops any requests of blacklisted servers and forwards all other requests to a proper DNS service. While it sounds like it adds a tremendous amount of overhead, in reality DNS requests are imperceptibly fast. Whatever time the Pi-hole adds to your internet surfing is more than returned to you in the form of un-downloaded advertisements. It's not 100% - mine reports blocking approximately 25% of all requests - it does result in a substantially cleaner-looking internet experience.
As a caveat, all of this may require some monkeying around with whatever hardware routs traffic on your network. The individual settings and terminology used may differ slightly, but the core ideas will remain the same.
Going Virtual (Machine)
While Pi-hole earned it's name from people running Linux on a ~$35 Raspberry Pi microcomputer, you can run it on many Linux systems (including Ubuntu, Debian, CentOS, and Fedora). Wait, you say... I thought this was going on macOS? Well, kind of. I installed mine on a virtual machine (or VM) running Linux on top of macOS. For the uninitiated, think of a virtual machine as a piece of software that pretends it's an actual computer. In this case, I'm using Oracle's free VirtualBox software. It's not the most robust virtual machine software out there, but it's good enough to do what we need. In addition to downloading VirtualBox, you'll also want to download a Linux image. Any of the above are fine, but I strongly recommend you go with something without a graphical user interface. On the rare chance you access this system, you won't be using a mouse... just a command line. Be brave! It will pay significant dividends in system speed and resources. In my case, I used Ubuntu Server.

Installation of VirtualBox is fairly straightforward. Upon opening it for the first time, you'll only have a few options. In your case, let's hit that big blue starburst that says New. It will ask you what kind of image you'd like. Enter a name for the computer (get creative, if you'd like), specify the type as Linux, and then what flavor you've downloaded. By default it should have 1024 MB (1 GB) of memory and Create a virtual hard disk now selected. These are fine, though you may change them if needed. If you need to be conservative on system memory, Pi-hole operates fine on 512 MB of memory.

Next, VirtualBox will ask about the VM's location and the size of the virtual hard disk. I left mine at the default location and hard disk size of 10 GB, though Pi-hole will run fine on as little as 52 MB. All other default settings are fine.

At this point you'll see your brand-new Linux computer ready to go in the list of computers on the left. Ignore my already-running Ubuntu Server.

While Pi-hole (or whatever you have named it) is selected, click the Settings icon and navigate to the Storage tab. Under the storage devices window you'll see Controller: IDE with a small icon that looks like a compact disk and a plus for Add Optical Drive. Click it.

Click the Add button in the window that follows and navigate to where you downloaded your Linux image file and select it and hit Open followed by Choose and OK.

While still in Settings, go to the Network tab and enter Adapter 1, make sure you have changed the Attached To dropdown menu to Bridged. The name should be whatever interface your Mac uses to talk to the network. In my case, it was en0 (or Ethernet, the wired interface), but for many this will be en1 (WiFi). This will make sure that your VM has its own IP address separate from the computer it's hosted by. Now you're ready to fire it up! Hit the big green start arrow!

At this point, Ubuntu Server is setting up and you'll see all kinds of messages. You may also notice some messages regarding VirtualBox and Mouse/Keyboard capture and integration at the top. You can hit the slashed comment balloon icon to make them go away. Now select your language, keyboard, and the network interface you specified above. For most of the next settings, unless you have a good reason to do otherwise (and if you do, you're probably not surfing a how-to like this), push through to the screen below.
Tip: In non-graphical systems like this, you can navigate between what's highlighted using the TAB key.

This is where you tell the operating system who you are, the name of your server (which will help you find it on the internet), and most importantly, your username and password. Make them complicated and write them down somewhere! Next, you can start identifying certain add-ons. The first we'll select is Installed OpenSSH Server by hitting Enter and tabbing down to Done. This will enable easy access from other machines on the network to update (more on that later). The next screen will show you lots of other neat packages you can install. Move on town to select Done. You don't need any of them! Reboot as directed.

Oh no! A bunch of errors! What to do? Nothing. Just click that red X to close the window and select Power off the machine. Then, select your VM in VirtualBox and click the mighty green Run arrow again! You should be greeted by a login prompt. Hopefully you remember the username and password you just specified a minute ago.

... and you're in! Now for the fun stuff. Type the following and hit Enter:
curl -sSL https://install.pi-hole.net | bashIt will then prompt you for your password. This is normal!
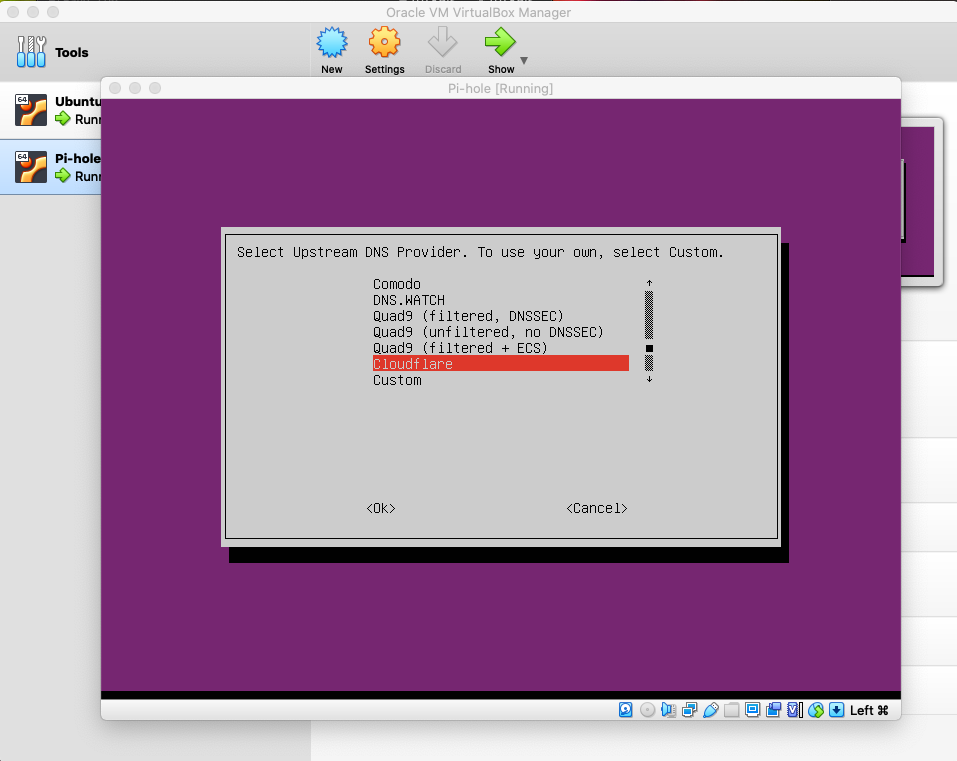
You'll click OK through a couple of prompts and then it will ask you for an Upstream DNS Provider. They're all great options, though for many reasons I eschew Google's DNS. I'm currently using Cloudflare, but feel free to use whatever one you'd like. They're all likely faster than your ISP default. Next, you'll click OK through a series of options. Of note, you'll definitely want the web admin interface. All other defaults are fine.

At this point, Pi-hole is up and running on the IP address above. You should be able to access it now via the web interface at http://pi.hole/admin. Write down the IP address and the Admin Webpage login password you see displayed. Test it out before you click okay and close this window!

Looks like it's up and running! The only thing I would advice is consider changing the default password by heading back over to your pi-hole VM on VirtualBox and typing the following:
sudo pinhole -a -p password... where password is replaced with whatever new super-complex password you want for the web interface. This can be (and should be) different from the Linux admin password you created.
Now that the hard part is done, there are just a few final steps. First of all, go into the configuration interface for your networking hardware. For most people, this will be their WiFi router. The method varies wildly by device, so it may take some consultation with your router's instruction manual, but your desired end state is to make it so your new VM always gets that same IP address (10.0.0.30 in the example I used above).
Next, you'll want to point your router's DNS server to that IP address. This will tell your router to refer all DNS entries to Pi-hole. Now go check out your favorite advertisement-riddled web site and notice how clean they are! You may need to reconnect your device to your Router to force your computer to get the latest DNS settings from there.
Autorun on macOS
Up until now, 100% of the steps have been fairly operating-system agnostic. That said, now you're left with Linux running in a window on your computer with VirtualBox proudly displayed! Here's where we get into some macOS-specific configurations to make the whole system run seamlessly in the background. Go ahead and close up your VM and VirtualBox.
Warning: unless you switch your DNS back on your router, this will cause your internet traffic to stop until you re-open your VM. We'll have you back up in running in a few minutes!
Open up your Terminal application on macOS (more command line fun) and type the following and hit enter:
nano StartVM.commandThis will launch a text editor with a blank file named StartVM.command in Terminal. Type (or copy/paste) the following (replace "Pi-hole" with whatever you named your VM, keeping the quotes):
#!/bin/bash
VBoxManage startvm "Pi-hole" --type headless;
Hold Control and hit X. This will prompt you to save the file. Do so by hitting Y and Enter. Next type the following and hit Enter:
chmod 777 StartVM.commandThis will allow your new script to be executable. You'll see it inside of your macOS User directory, and you can double click it to run it. It will open up a Terminal window that resolves with a Process Completed message that you can close. With that, VirtualBox has now launched your Pi-hole VM into the background! After a minute or two, you should once again be able to access the Pi-hole web interface and the internet.
To set it to autorun when you first log in is pretty easy. Go back to your trusty Terminal window and type the following and hit Enter:
nano ~/Library/LaunchAgents/com.pihole.plistThis will open up another next text file. Inside type or copy/paste the following:
<?xml version="1.0" encoding="UTF-8"?>
<!DOCTYPE plist PUBLIC "-//Apple Computer//DTD PLIST 1.0//EN" "http://www.apple.com/DTDs/PropertyList-1.0.dtd">
<plist version="1.0">
<dict>
 <key>Label</key>
 <string>com.pihole</string>
 <key>ProgramArguments</key>
 <array><string>/Users/kearny/StartVM.command</string></array>
 <key>RunAtLoad</key>
 <true/>
</dict>
</plist>
Make sure you change where it says kearny to your macOS account's username!
Now as soon as you log into your Mac, it will launch VirtualBox with your Pi-hole VM in the background!
Updating
Like any good system, occasionally it needs an update. Both Pi-hole and the blacklist can be updated. The blacklist itself is called Gravity and can be updated from within the web interface under tools. Pi-hole itself it updated by launching your Terminal window and typing the following:
ssh kearny@10.0.0.30Obviously, you'll change the username and IP address to what you defined when you set up Linux. The first time using Secure Shell (ssh) it will ask you to type Y to trust the host fingerprint; this should only happen once. If it happens more than once, you are trying to access the wrong system! After that, it will ask for your account password.
From there, it's super-easy. Type in the following and hit Enter:
pihole -vThis will show you the current installed version and there's a newer version available. If there's a newer one, use the following command. It will ask you again for your Linux account password.
pihole -up... and that's it! Super-simple. If you're feeling saucy, you can also update Gravity from the same command line with the following input:
pihole -gThere are even more commands to explore if you really want to nerd out. Check them out at the Pi-hole documentation page!
Conclusion
I know that seems like a lot of steps, but it all comes together surprisingly fast and works surprisingly smooth. The nice thing about this Pi-hole setup is that it requires almost no further work on your part and will automatically function for all devices across your network. I've been running Pi-hole on my network for around two years now with zero hiccups. Now that I've sold you on it, know that a ton of ads do still make it through. It's not perfect, but for what it is, it's very unobtrusive.
Let me know how your installation goes and what you did differently!


Comments